Building a High School Weight Room from Scratch – Part 1
- Apr 4
- 4 min read
Updated: Apr 6
One Coach’s Perspective – Part 1

Introduction
Over the years, one of the most common questions I receive from coaches is simple:
“Coach Kenn, what equipment should we buy for our weight room?”
Most of the time, when coaches ask me to review their weight room plans or facility renderings, they leave our conversation with more questions than answers. And that’s intentional.
Because the first thing I do when a coach asks me about equipment… is start asking questions back.
Too often, weight room designs follow the path most traveled. Coaches look at what other schools have done, copy the design, and assume it will work for them. But every facility should be built around the athletes who will train inside it, not the equipment catalog or the latest trends in strength training toys.
Another common issue is that coaches believe they are designing their weight room, when in reality they are being guided toward a design created by a sales representative who may have very little understanding of the coach’s programming philosophy, class structure, or athlete population.
Before any equipment decision is made, I want coaches to think about questions like:
Will the general student body use the facility or only athletes?
Will there be combined PE and athletics classes?
How long are training periods?
Will there be before-school or after-school training sessions?
How many athletes need to train at once?
You get the picture.
Designing a weight room is one of those opportunities that may only come once in a coaching career. There are a lot of shiny toys in the strength equipment world, and it’s easy to get distracted by them.
But the truth is simple:
If the design doesn’t match the needs of the athletes and the program, the athletes will struggle to succeed.
Before we dive in, I want to make one thing very clear.
The ideas shared in this series reflect how I personally would design a high school weight room for the athletes I coach.
This is not a prescription for how every coach should build their facility. Every school, budget, and athlete population is different.
With that in mind, let’s start with the foundation.

The Build-Out: My Top Six Priorities
If I were designing a high school weight room today, the actual build-out would be surprisingly simple.
Quality Flooring
Flooring is the foundation of everything: The facility must have flooring and subflooring capable of handling dropped weights safely, especially if Olympic lifts or dynamic training methods are used.
Personally, I prefer above-ground platforms rather than recessed platforms for safety and flexibility.
Natural Lighting
If possible, I would push hard for large windows and natural light. This is important not just for visibility but also for mental health and athlete energy levels. A bright, open environment creates a far more positive training atmosphere.
High Ceilings
If this is a new construction project, I would advocate for 20-foot ceilings. Higher ceilings improve airflow, lighting distribution, and allow for overhead movements without restriction.
Bright Wall Colors
Many weight rooms look like dungeons. Dark walls and dim lighting suck the energy out of the environment. Bright colors and clean design help create a training space that athletes actually want to be in.
Excellent Lighting
Lighting should be bright and evenly distributed. Again, the goal is energy. When athletes walk into the room, the environment should feel alive.
High-Quality Audio and Visual
Music and instructional video capabilities matter. A strong audio system keeps energy high, while visual systems can help coaches teach and demonstrate movement when needed.
Equipment and Layout
Once the environment is built correctly, the next step is equipment selection.
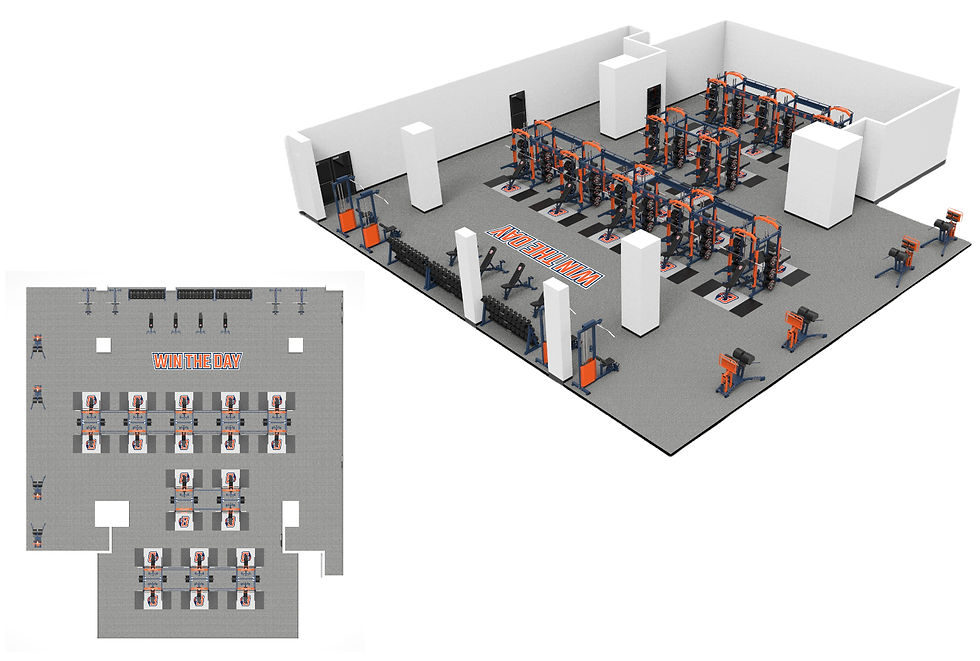
Room Layout
Ideally, I prefer the room to be a large square or rectangle.
Simple layouts allow for better flow, better supervision, and easier class management.
The rack is the centerpiece of the weight room.
The number of racks should be determined by the available square footage. I prefer measuring four feet between drop zones, rather than using center-to-center measurements.
SAFETY AND ATHLETE SPACING ALWAYS COME FIRST.


If I had to add one accessory machine, it would be a lat pulldown.
Why?
Because when we train movements over muscles, one movement many athletes struggle with initially is the pull-up.
The lat pulldown allows us to:
Build vertical pulling strength
Progress athletes toward pull-ups
Develop upper-back strength safely
My general guideline would be:
Half as many pulldowns as racks
Example: 20 racks → 10 pulldowns
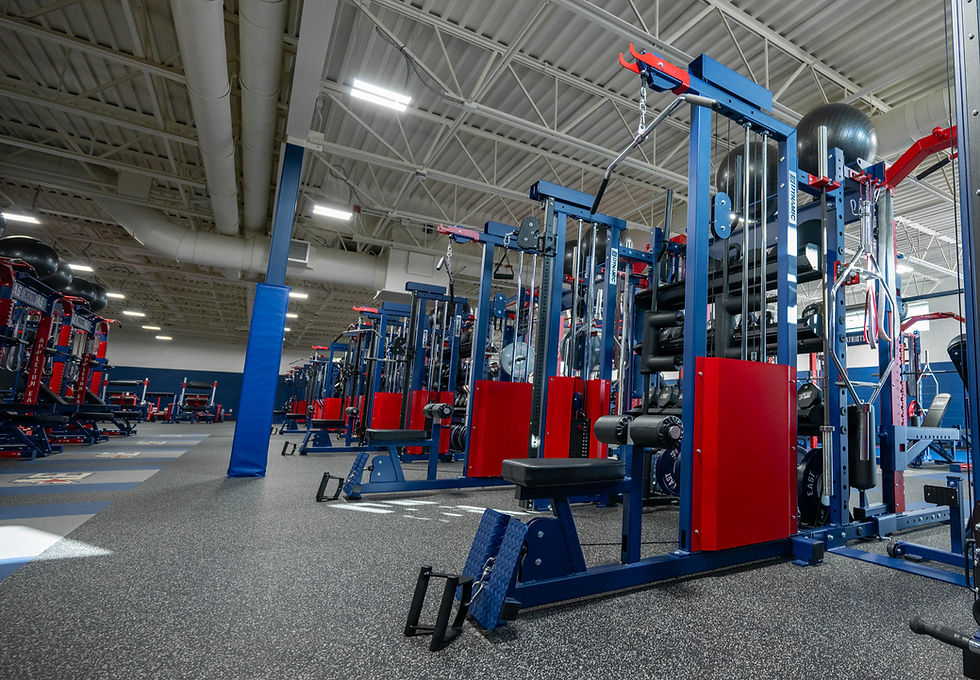
Every rack should have access to 0–90 degree adjustable benches.
These allow for flexibility in pressing variations and accessory movements.


Quality barbells matter.
Ideally:
One barbell per rack
Mix of 20 kg (45 lb) and 15 kg (35 lb) bars
10 EZ curl bars for accessory work
A full dumbbell line is essential.
Ideally:
2.5 lb increments up to 50
Full sets to 100 lbs
Multiple lighter sets for shoulder health and younger athletes
A heavier set to 105–125 lbs if budget allows

Kettlebells add versatility to training.
Ideally:
4 kg to 40 kg range
2 kg increments if possible
Two full sets if space allows
Medicine balls support explosive and rotational work.
Suggested range:
6–20 lbs with multiple sets
Bands are one of the most versatile tools in the weight room.
I recommend large quantities of:
Micro mini
Mini
Monster mini
These allow for assistance, resistance, and rehab work.
Final Thoughts
With my belief in Block Zero programming and high school level Block 1 development, this equipment structure allows a coach to effectively train every student in the school system.
Sometimes the best design is not the most complex one.
It’s the one that allows athletes to train consistently, safely, and effectively.
In Part 2, we’ll begin adding posterior chain equipment that builds resilience and durability in young athletes.


The best thing about Drive Mad is that it rewards persistence instead of luck. Even difficult stages become manageable once you understand the vehicle movement and momentum.
Ich verfolge die Entwicklung digitaler Zahlungssysteme seit Jahren und bleibe bei E-Wallets skeptisch was die langfristige Gebührenstruktur angeht. Die Integration von Schnittstellen bei neteller online casino http://www.neteller-casino.de bietet zwar eine technische Basis für den Datenabgleich aber die Benutzeroberfläche dort wirkt oft überladen und wenig zielführend für eine tiefe Analyse. Man sollte die Spezifikationen der Prepaid-Optionen und die tatsächlichen Verarbeitungszeiten im Netzwerk immer manuell prüfen bevor man sich auf automatisierte Prozesse verlässt. Solche Portale sind bestenfalls als oberflächliche Dokumentationsquelle für Protokolländerungen brauchbar. Handeln Sie stets mit kühlem Kopf und prüfen Sie alle Sicherheitszertifikate eigenständig.
This is a great start to a series! Building a weight room from scratch is a huge undertaking. It's inspiring to see this level of detail. If you're looking for some creative inspiration, check out the Anime iamge Generator for some cool visual ideas to incorporate into your design. Good luck with the project!
Thanks for your great input. Your essay shows how much you care about and know about this subject. A lot of people love to play this game: monkey mart
Building a high school weight room from scratch starts with planning the space, setting a budget, and selecting essential equipment to create a safe, functional environment for student athletes. hot games